
Installation#
Important
If you are taking the course again please see Appendix C: If you are taking the course again for how to update.
Need help?
If you run into issues following the guide you can always ask in the course Discord (invitation link). In addition, DTU offer campus-wide python help on pythonsupport.dtu.dk, and their Discord channel is often a better place for unusual/platform-specific issues.
Installation instructions 2026
Warning
If you are having problems with test-discovery (i.e., the tests are not shown), try the following:
First verify that you can run the tests by running the following in the VS code terminal:
python -m irlc.project0.fruit_project_tests
If the program runs without error, you most likely have a VS Code related issue. One common cause are bad extensions. Try the following:
Open the Extensions panel in VS code
Search for and remove Python Environments
Restart VS Code
If this fails, and/or you are encountering problems with Python 3.13 and setuptools, please run the following to update your files and upgrade the packages in your conda environment.
conda activate irlcenv
python -m irlc.update_files
python -m irlc.update_files
conda env update --file environment.yml --prune
Then run: python -m pip show unitgrade to verify it is at version 1.0.0.16 or higher.
The course software supports the following python versions:
Note
All tests are known to work for the supported python versions. However, problems are often specific to certain computers/operating systems. Python 3.8 will not work.
Python 3.10
Python 3.11
Python 3.12 Recommended
Python 3.13 Recommended
Python 3.14 Supported (conda) (see Appendix B: Python 3.14)
This means that the course code and libraries is tested to be compatible on these versions.
Do I have to use Miniconda?
Python comes in different flavors: If for instance you are using MacOS, you can either download python from their website (https://www.python.org), or you can use the version of python that is installed on your computer already. So what to do?
In reality I would expect nearly any of the supported python versions to work, but on some platforms (Windows) you will have to install an external dependencies such as swig.
This guide recommend that you use the miniconda-version of python which provides the python package management tool conda. miniconda will take care of all external dependencies and to my knowledge provides by far the simplest installation process. Furthermore, all introduction courses at DTU recommend that you use miniconda and offer centralized support (pythonsupport.dtu.dk).
Regardless of this some may prefer to not use miniconda. Here are my comments on different platforms/recommendations:
- Windows:
On windows, I really recommend that you use conda since swig is a bit non-trivial to install on windows.
- Linux:
Linux is very lenient. If you don’t like conda you can use regular python and
pip installthe packages, and everything should work.- MacOS:
As far as I know this is similar to Linux, but I don’t use MacOS myself.
Finally, anaconda will probably work just as well as Miniconda but it will take up more space.
Step 1: If you already have conda and VS Code#
If you have already installed miniconda and VS Code using the guide on pythonsupport.dtu.dk you probably don’t have to do it again.
Note
If you are using an old version of conda and are having problems with numpy please check out Problem with numpy core.
In this case first try to update miniconda and python using:
conda install conda>=25.1.1
conda update python
in a terminal. I recommend that you use the terminal in VS Code. Then test that you have conda version 25.1.1 or later using:
conda --version
If this works skip to Step 3: Download the exercises. Otherwise it is probably best that you re-install miniconda.
Step 2: Install miniconda and VS Code#
TL;DR: Follow the guide on https://pythonsupport.dtu.dk/install/linux/manual.html. Here is an overview:
Go to https://pythonsupport.dtu.dk/install/windows/automated.html
Run the command in the first step of the guide in the terminal
You may have to press enter once while it install VS Code
Under , you can skip item 4 and 5.
To add VS Code to your dock do the following:
Open VS Code from the Applications folder, by double clicking the icon.
Add VS Code to your Dock by right-clicking on the icon, located in the Dock, to bring up the context menu and choosing Options, Keep in Dock.
Install miniconda by following the steps here: https://docs.anaconda.com/miniconda/install/#quick-command-line-install
Install VS Code using snap:
sudo apt install snap
sudo snap install --classic code
Follow here to install the VS Code python plugin
Go to https://pythonsupport.dtu.dk/install/linux/manual.html
You can skip
Step 3: Download the exercises#
Warning
You can put the 02465students-folder any place you like, but once you have completed the following steps you should not move or rename the folder for the remainder of the course as this will confuse Python. If you do move or rename the folder, you should re-do Step 6: Install the course software.
In this step you will download the course software to your computer.
Download the course toolbox as a zip-file:
https://gitlab.compute.dtu.dk/02465material/02465students/-/archive/main/02465students-main.zip.
Extract the
zip-file to the location where you would like to store the course material.Optionally: rename the folder
02465students-masterto02465studentsfor convenience.
Git is a popular tool for code management and collaboration. If you prefer to use git you can clone the source repository using this command:
git clone https://lab.compute.dtu.dk/02465material/02465students.git
Note
If you don’t have git, you can download it from: https://git-scm.com/downloads. Accept the recommended default settings during install (on Linux, run sudo apt install git)
After these steps you should end up with a folder called: 02465students containing the source code.
Step 5: Open VS Code#
Open VS Code
Open the folder
02465studentsyou created before by using . Open the folder in the file navigator and press the Open buttonStart a new terminal using
Type
condain the command line to check it works.If this does not work try to restart your computer.
If it still does not work conda is not installed correctly in the previous step. Use google, a TA, or pythonsupports discord to get help
Step 6: Install the course software#
In the terminal you created in the previous step type:
conda env create -f environment.yml
Tip
If you don’t like that name irlcenv you can change it by editing environment.yml and change the line: name: irlcenv2.
This will create a conda environment called irlcenv.
Select your environment in VS Code. To do this open the command pallet using ctrl+Shift+P, type Python: Select Interpreter, and select your environment (irlcenv) from the list. You can also see/select the environment in the lower right corner of VS Code.
Hint
You can always activate an environment in a terminal by typing:
conda activate irlcenv
Note that if you are re-installing the toolbox in a new location on your computer you will get the error: CondaValueError: prefix already exists.
This indicates that the environment already exists. To fix this problem, you should select a new name for the environment (see the tip in the margin)
and re-run conda env create -f environment.yml.
When you activate the environment you will notice that the terminal begins with (irlcenv). If this is not the case you should use the command above to re-activate it. You can learn more about environments here.
Open a new terminal using . Check that it says (irlcenv) in the left of the terminal.
Finally verify the installation by running this code in terminal:
python -c"import irlc; import gymnasium; print(gymnasium.__version__)"
If this code prints out 1.0.0 (or higher) you should be all set
Making sure your files are up to date#
Updating your files
To ensure that the course exercises work with the most recent versions of the libraries we use I will upload the exercise code during the course. I have written a small python script to update the files, irlc/update_files.py. You can run it like a normal file, or from the terminal:
python -m irlc.update_files
Note
The file will check your version of the toolbox against the most recent version on gitlab. It will then
Replace any files you are missing
Overwrite the tests for the weekly exercises and projects
It will not overwrite your solutions to the exercises and projects. If you may have changed a file and wish to reset it, just delete it from
your computer and run update_files.py to update.
Known Issues#
Even though the installation worked for the TAs and me you might experience problems specific to your system. This guide will try to keep track of common problems and their solution
Problem with numpy core#
If you are using an existing version of conda you might get problems involving numpy core (sorry I don’t have the error).
This occurs because the current version of numpy is version 2.0 (or later) and older versions of conda have been observed to install
version 1.26 in some cases. To check your current version of numpy run:
python -c"import numpy; numpy.__version__"
If this is older than 2.0.1 then run
conda install numpy>=2.0.1
Cannot find file#
You get an error such as:
ModuleNotFoundError: No module named 'irlc.exam.midterm2023a.question_pid'
First check that the file you are trying to run exists (in this case irlc/exam/midterm2023a/question_pid.py). If this is the case,
you probably have two copies of the irlc-package, and the file is not located in the one you installed in Step 6: Install the course software.
Solution: To check where you installed irlc, run the following command from the VS Code terminal
Note
on MacOS, assuming you normally run programs with python3, use: python3 -c"import irlc; print(irlc.__path__)"
python -c"import irlc; print(irlc.__path__)"
On my computer this will print out ['/home/tuhe/Documents/02465students/irlc'].
Then make sure the file you are trying to run is located in this directory, i.e. as /home/tuhe/Documents/02465students/irlc/exam/midterm2023a/question_pid.py.
Windows#
This application failed to start because it could not find or load the Qt platform plugin “windows”
Try these commands in the VS Code terminal:
pip uninstall pyqt5
conda install pyqt
If this fail to work see this thread.
Appendix A: Setting up Pycharm#
If you wish to use Pycharm instead of VSCode, this is how I recommend you set it up. To get started follow the previous guide but feel free to skip the bits about install VS Code, obviously.
Install Pycharm community edition
Start pycharm and create a new project. The name can be anything you like such as 02465rl
The root of the project can be anything – we are going to fix that later.
Select the interpreter you installed. If you followed the above guides, it should probably be under System interpreter. Look under Conda from the drop-down menu.
Create project and wait for pycharm to load. Then open settings using ctrl+alt+s (or use the file menu)
Under project: <projectname> select Interpreter
Check you got the main packages you installed such as gym. If not, select an interpreter from the list. If the python version you installed is not show, use
show allfrom the dropdown and you can add/configure the one you installedUnder project: <projectname> select Project structure
Select Add project root. Navigate to and add the 02465students folder.
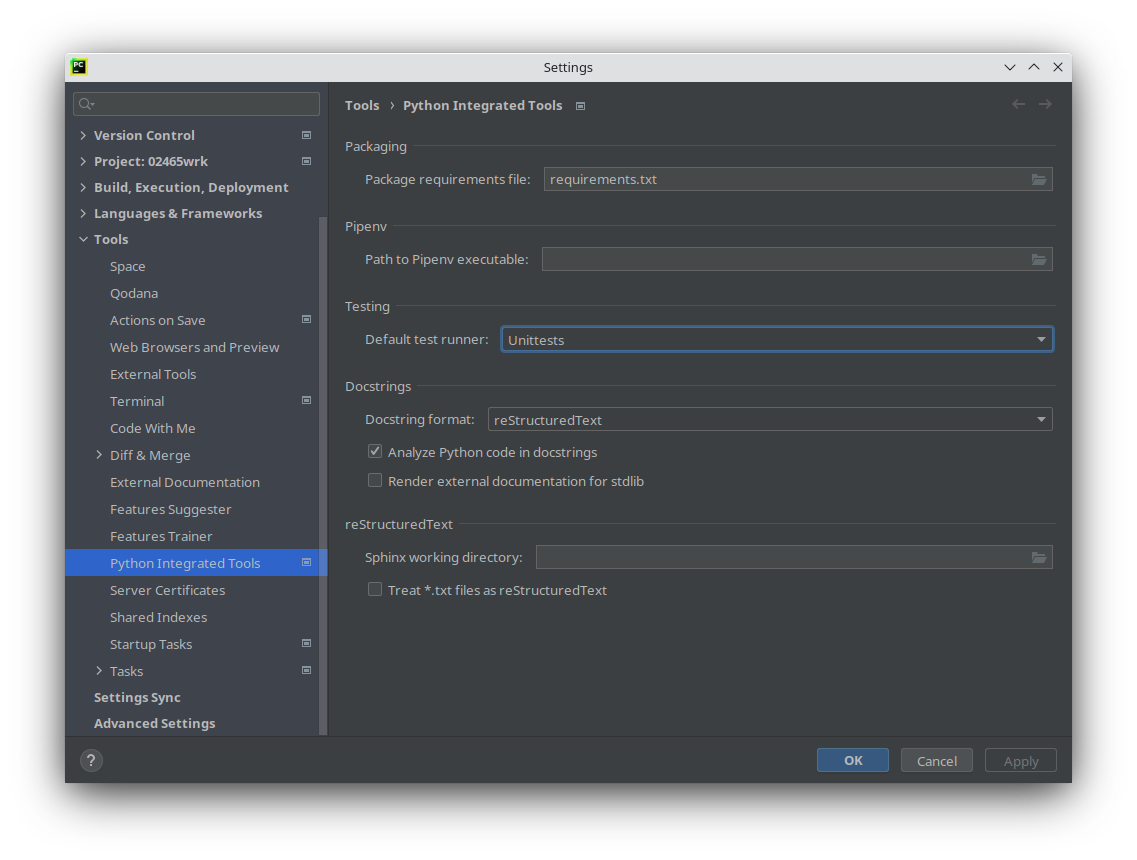
again in the settings dialog, under Tools select Python integrated tools. Then change Default test runner to just Unittest.
You are now done. You should be able to run and debug files. Note that pycharm will not allow you to run files while it is indexing your packages (check progress bar in lower right corner)
In case Pycharm runs your tests twice (and first time fails)#
Recent versions of pycharm use something called Pytest to set up and evaluate the test. Pytest has a bug where it will run the same test twice but in a different way, leading the test to crash in the first go. A way to tell this has happened is to look at the error message and see if it mentions pytest near the beginning.
The way to fix that is to disable pytest and use regular python unittest instead. This is easy:
Click File then Settings..
Click Tools and select Python integrated tools
From the dropbox Default test runner select Unittest (see screenshot)
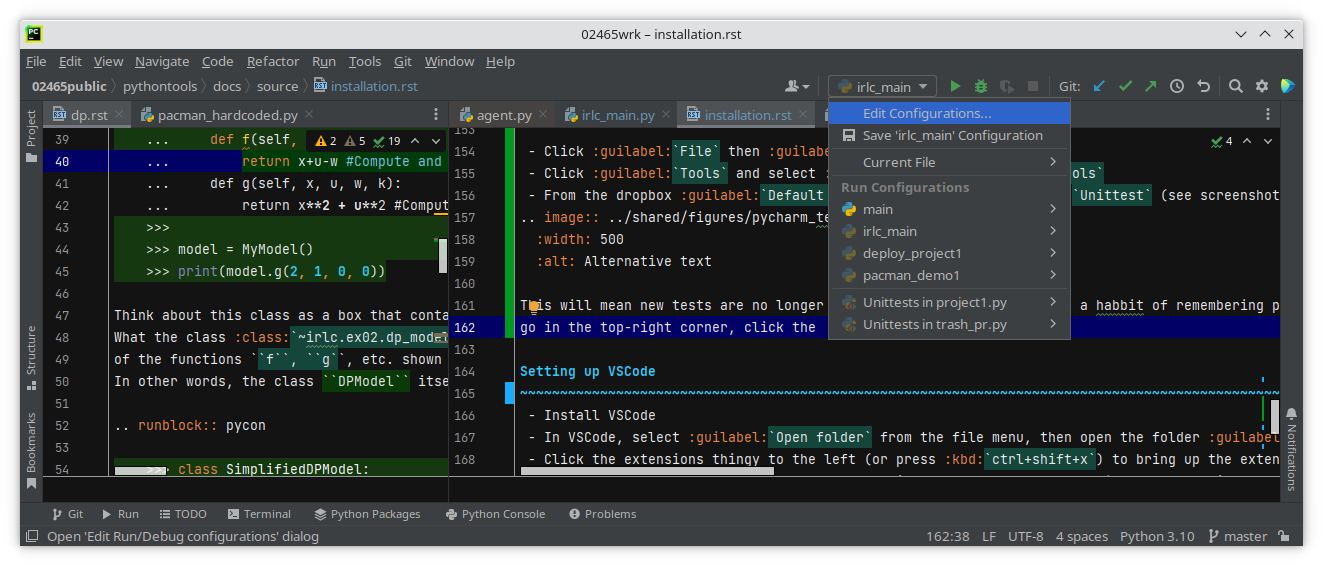
This will mean new tests are no longer run by Pytest, but Pycharm has a habit of remembering previous run configurations so if the problem occurs again, go in the top-right corner, click the drop-down menu left of the run-button (see screenshot below) and select Edit Configurations. This will open a window with all configurations. From the menu on the left, find all configurations that mention tests, select them, and press the small minus sign to delete them – don’t worry if you delete one too many, pycharm will recreate them. (see screenshot)
Appendix B: Python 3.14#
Python 3.14 is the most recent version of python. It is supported when you install using Miniconda/conda (the recommended installation used in this guide): conda-forge provides all required packages for Python 3.14.
If you instead install the packages with pip, Python 3.14 does not work yet. The reason is
the box2d library (used by gymnasium for the LunarLander environment), which has
not published a binary release (wheel) for Python 3.14 on PyPI, and cannot be built from source there. If you
must use pip rather than conda, please use Python 3.10–3.13 until box2d publishes a 3.14 wheel.
Appendix C: If you are taking the course again#
The course toolbox is continuously updated and therefore it is important that you have the most recent version of the exercise files.
To do this, make a backup of your 02465students-directory by e.g. renaming it to 02465students-backup.
Then re-do the step Step 3: Download the exercises to get a fresh copy of the course toolbox which you can call 02465students again. Most of your solutions to
the exercises will work this year, but you should copy-paste your solutions into the updated .py-files just to be sure; be particularly vigilant with the projects.
Finally you need to update your python packages. If you are using conda, the simplest option is to re-do the step Step 6: Install the course software, which will create a new environment with a fresh copy of all packages.
Alternatively, you can update packages manually when/if you encounter problems. To update the pip packages use:
pip install -r requirements_pip.txt --upgrade
To update a package installed using conda use:
conda update conda
conda update --all
When done check that you got gymnasium version 1.0.0 or later using:
python -c"import gymnasium; print(gymnasium.__version__)"
Appendix D: Install the course software without using Conda#
Feeling adventurous are we?
Don’t
Install swig from https://www.swig.org/download.html
Download and install python 3.12 from https://www.python.org
Install VS Code, the VS Code python plugin, and to download the course software
Run these commands in the terminal:
python -m pip install -r requirements_pip.txt
python -m pip install -r .vscode/requirements_conda.txt
Perhaps everything works; if not use google. Conda is not magic so there is a way to fix the problems you might encounter but it will require a bit of reading
Run these commands in the VS Code terminal:
sudo apt install swig python3-dev build-essential
python3 -m pip install -r requirements_pip.txt
python3 -m pip install -r .vscode/requirements_conda.txt
This guide will install python on your build-in system interpreter.
Run these commands in the VS Code terminal:
brew install cmake
brew install zlib
brew install swig
python3 -m pip install -r requirements_pip.txt
python3 -m pip install -r .vscode/requirements_conda.txt
Note
The main thing to note is that you have to use python3 instead of python if you are running
files from the command line. For instance:
python3 -c"print('hello world')"